 USA
 Canada
 Brazil
 Germany
 France
 Italy
 Switzerland
 Sweden
 Spain
 Great Britain
 Norway
 Russia
 South Africa
 Japan
 Australia


Short answer: surface cracking in the finish of leather can often be softened and sealed at home. Deep cracks, splits and failing stitching cannot be trusted to protect you, and a cosmetic repair does not restore abrasion or impact protection. If a cracked race suit or riding jacket has damage in an impact or abrasion zone, have the maker or a specialist inspect it before you ride again.
Key takeaways
- Small scratches, faded color, surface cracking and minor tears can often be repaired at home with a cleaner, conditioner, filler and matching color.
- Always clean the area first and test every product on a hidden spot before using it on a visible one.
- Thin layers and full drying or curing time between steps give a more natural result than heavy application.
- Deep cracks, splits, large tears and damage in impact zones on riding gear need a professional opinion. Cosmetic repairs do not restore protection.
Why leather cracks
Leather is a flexible material only while its fibers and its finish stay supple. Cracking usually has one or more of these causes:
- Dryness. Leather loses oils over time. Without conditioning, the surface stiffens and breaks along the creases.
- Sweat and salt. Sweat dries into the leather and leaves salts that stiffen it, especially on gear worn hard.
- Heat. Radiators, car interiors, hair dryers and direct sun dry leather fast. Guidance from the Canadian Conservation Institute, written for museum collections rather than worn clothing, notes that heat can dry leather out and that dyes are often among the parts most susceptible to light and UV fading. For worn clothing, the garment's care label governs.
- An old or failing finish. The coat of pigment or sealant on the surface can crack and flake while the leather underneath is fine.
- Repeated flexing. Elbows, knees, the back of the knee on pants and seat areas bend all the time, so they crack first.
Surface cracks versus deep cracks
Before you fix anything, find out what kind of damage you have. A simple check:
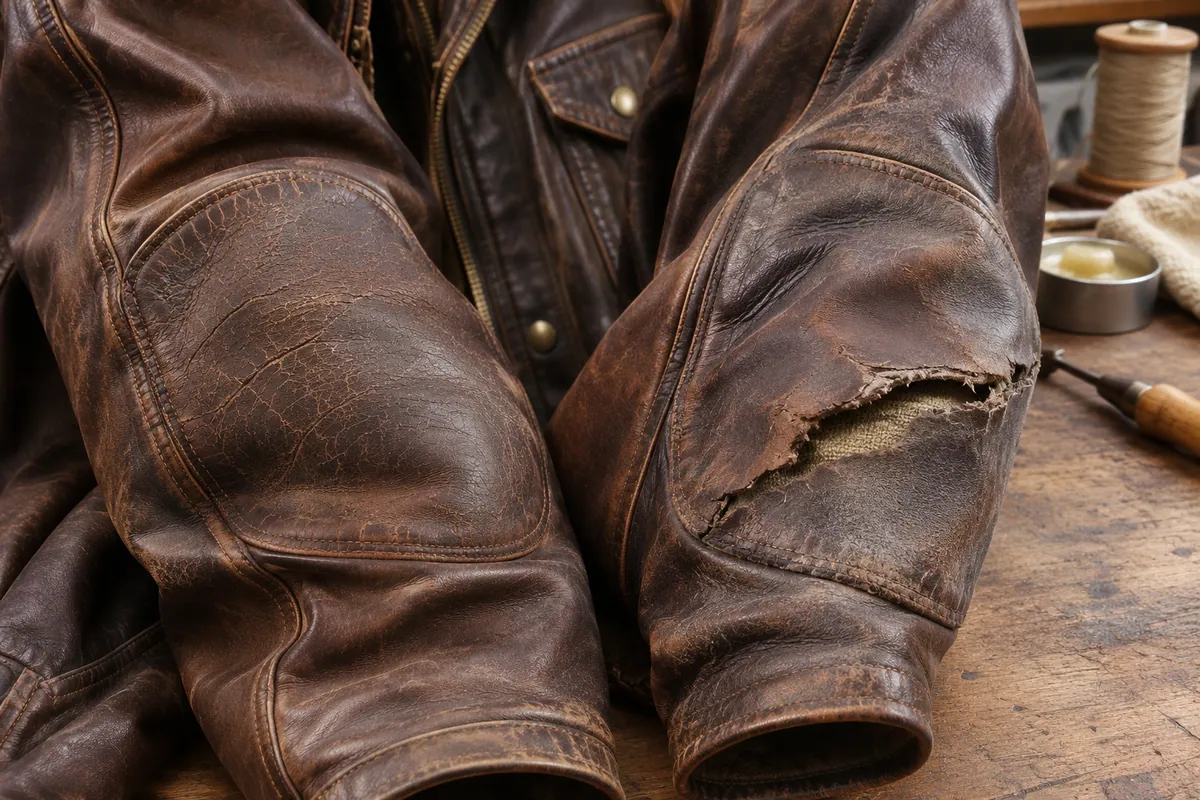
- Clean the area and let it dry.
- Flex the leather gently with your hands, bending it so the crack opens slightly.
- Look at the crack. If you only see fine lines in the colored finish and the leather beneath is the same color, it is a surface crack.
- If you can see a different layer or fibers, if the crack opens into a gap, or if the leather feels thin or spongy, it is deep.
- Check the stitching around the area. Loose, frayed or broken stitching is a structural problem, not a surface one.
| What you see | Likely meaning | What to do |
|---|---|---|
| Fine lines in the color, leather intact | Surface cracking of the finish | Clean, condition and seal; home repair is reasonable |
| Flaking color or peeling finish | Failing surface coating | Clean, then restore color in thin layers |
| Gap or open split | Deep crack | Needs a professional |
| Fibers showing | Leather is worn through | Needs a professional or replacement |
| Loose or broken stitching | Seam failure | Needs a professional repair |
Why leather repair is worth it
Leather ages. That is normal. But damage does not always mean replacement. When you repair it early, you stop the damage getting worse, avoid the cost of replacing the garment and keep it comfortable to wear. Left alone, a crack keeps flexing with every wear and gets deeper. Cosmetic repairs do not restore abrasion or impact protection. Have any tear, split seam or other damage on a riding suit or jacket assessed by the maker or a specialist repairer before riding.
Common types of leather damage
1. Surface scratches
Light marks caused by friction or contact. Most do not damage the leather deeply.
2. Faded color
Sunlight, heat and sweat pull color out of leather.
3. Small tears or cracks
These appear on elbows, knees or seams. This guide covers only small, home-repair-safe damage. Large tears or deep structural damage need professional repair.
Basic tools you will need
Expensive equipment is not required:
- Soft microfiber cloth
- Leather cleaner
- Leather conditioner
- Leather repair compound or filler
- Matching leather dye or balm
- Small sponge or applicator
Always test products on a hidden area first.
How to repair surface cracking
This works for fine cracks in the finish where the leather beneath is sound. Test each product on a hidden area first, and follow the product's instructions, as they vary by finish and dye type.
- Clean. Wipe the area with a leather-safe cleaner and a soft microfiber cloth. Do not scrub, and let it dry fully.
- Condition. Apply a small amount of a conditioner suited to the leather's finish with a clean cloth. Work it in with gentle circles and let it absorb. This can restore some flexibility.
- Fill, if the cracks are open. Use a thin layer of leather filler with a toothpick or small spatula. Press gently, smooth the edges and let it cure fully.
- Color. Blend a matching leather balm or dye over the repaired area in very thin layers, letting each layer dry fully. If unsure of the shade, start lighter. You can darken leather gradually, but reversing a color that is too dark is difficult.
- Finish. Follow the dye or balm maker's instructions on sealing or conditioning.
Conditioner alone does not close cracks, and it does not fill them. It can soften leather so the cracks look less obvious and the leather flexes better. Heavy cracking needs more than conditioner.
How to fix leather scratches
Scratches are the most common leather damage, and the easiest to fix at home. Most surface scratches do not damage the leather deeply.
Step 1: Clean the area
Gently wipe the scratched area with a leather-safe cleaner and a soft microfiber cloth. This removes dust, sweat and oils that can block the repair. Never scrub aggressively.
Step 2: Warm the leather
Lightly rub the scratched area with clean fingers. The warmth softens the leather and lets its natural oils rise. For shallow scratches, this step alone can reduce their visibility.
Step 3: Apply conditioner
Apply a small amount of a conditioner suited to the leather's finish, following the product's instructions, using a clean cloth. Massage gently and let it absorb.
Step 4: Buff lightly
Buff with a dry, clean cloth to blend the scratch into the surrounding leather. If it is still visible, apply a tiny amount of color-matched balm in very thin layers.
How to restore faded leather color
Fading happens slowly, from sunlight, heat, sweat and wear. Faded leather can often be refreshed at home.
- Clean thoroughly. Use a leather-safe cleaner and allow the surface to dry fully.
- Choose the right color. Match the shade with a leather dye or balm. If unsure, start lighter.
- Apply thin layers. Use a sponge or soft applicator and dab gently. Never pour dye directly onto leather.
- Let it dry. Allow each layer to dry completely before the next.
- Finish. Follow the dye or balm maker's instructions for sealing or conditioning. The right product depends on the leather's finish and dye type.
How to repair small leather tears
Small tears can be repaired at home when caught early, usually in high-movement areas such as elbows, knees or seams. Important rule: if you can fit a finger through the tear, stop. Large or deep tears affect the structure of the leather and need a professional.
- Clean and dry. The surface must be completely dry before repair.
- Apply filler. With a toothpick or small spatula, apply a thin layer into the tear. Press gently without forcing excess onto the surface.
- Smooth. Flatten the edges so they sit evenly.
- Cure. Allow the filler to cure fully per the product's instructions.
- Color and condition. Blend matching color over the repair and finish as the product's instructions say.
This restores appearance and can stop a small tear from growing. It does not restore abrasion or impact protection. For further reading on similar repairs, see our post on DIY leather repair: fixing scratches, fading and more and how to fix scratches and scuffs on leather clothing.
Common DIY mistakes to avoid
A repair with the wrong product can add to the damage. Check the garment's care label and the repair product's instructions first.
- Using super glue
- Using nail polish
- Using shoe polish on riding gear
- Drying with heat guns or hair dryers
- Over-applying filler or dye
These shortcuts leave leather stiff or cracked.
Preventing cracks
- Condition on a schedule. How often depends on the leather and how hard you use it. Follow the product's instructions and the garment's care label; thin applications are better than heavy ones.
- Clean sweat off riding gear. Wipe the inside and outside after hard use. Our guide on how to clean a motorcycle race suit shows the routine.
- Dry gear properly. Let wet leather dry at room temperature, away from heat.
- Store well. Hang on a wide hanger or lay flat in a cool, dry place, out of sunlight and away from heaters.
- Check regularly. Look at elbows, knees, seams and the back each season so small problems get fixed early.
For the full care routine, see how to care for leather gear and how to clean and condition your leather jacket at home.
When a cracked race suit should be retired
A race suit or riding jacket is protective equipment. Its leather, stitching and armor pockets are meant to resist abrasion and hold together in a fall. When cracking goes beyond the surface, that protection may be reduced.
Signs to take seriously:
- Cracks or splits that go through the leather, or fibers showing.
- Thin, worn or stiff patches in impact or abrasion zones such as the shoulders, elbows, hips, knees and back.
- Loose, frayed or broken stitching at stress seams.
- Armor pockets that are torn or no longer hold the armor in place.
- Any damage following a crash.
We do not give an age or mileage after which a suit should be retired, because wear depends on use, storage and care. Ask a specialist repairer to inspect the garment (Leather Collection does not offer repairs). They can tell you if it can be repaired, and whether it should still be used for riding. A repair done at home to a protective garment should be considered cosmetic only. EN 17092 is the European standard for riding garments; read a summary of it on a standards body page, and check the garment's label and the maker's guidance. If a suit is past repair, see our leather race suits or consider a custom race suit made to your measurements.
After-repair care
- Follow the repair product's instructions on conditioning.
- Let the repair cure fully before riding or wearing.
- Store away from sunlight.
- Follow the garment's care label for cleaning.
Riding gear that has been damaged should be checked by the maker or a specialist repairer before it is worn again.
FAQs
Can cracked leather be repaired?
Surface cracks in the finish often can be softened, filled and recolored. Deep cracks, splits and stitching failures are better handled by a professional, and on riding gear they may mean the garment should be inspected or retired.
Why is my leather jacket cracking?
Common causes are dryness, sweat, heat, an old finish and repeated flexing at elbows and creases.
Is a cracked race suit safe to wear?
Not if the cracking is deep or in an impact or abrasion zone. Have the maker or a specialist inspect it. Do not rely on a home repair for protection.
How can I stop leather cracking?
Clean and condition it on a regular schedule, dry it away from heat, store it properly and check high-flex areas often.
Does conditioner fix cracks?
It can soften leather and make fine cracks less visible, but it does not fill or close them. Deeper cracks need filler or professional repair.
When should I replace leather gear?
When there is deep cracking, thin or worn areas in protective zones, failing stitching or crash damage, and a professional advises it. Riding gear should be inspected, not judged by age alone.
Can faded leather be recolored?
Yes, with careful preparation: clean the leather, choose a matching color and apply it in thin layers, letting each dry fully.
Is a leather repair permanent?
A careful repair can last a long time, but repairs in high-movement areas flex constantly and may need touching up.
If a suit is past repair, see leather race suits or order a custom race suit.